floor covering and design...with a fuzzy side
Showing posts with label hardwood. Show all posts

Thursday, September 15, 2016

How To Save Money by Creatively Repurpose Your Flooring


a hand measuring a piece of white carpet on a light hardwood floor


Unless your room is completely perfect in shape and size, you’re going to end up with leftover materials when purchasing new flooring.. In fact, most retailers add in extra materials as a backup just in case pieces are damaged during the installation. Since the cost of the extra flooring is included in the cost of purchase, most installers will encourage their customers to keep them. So what do you do with them? Most people just pile them in the basement or garage letting them collect dust until one day you say to yourself, “Why the heck do I still have this?” And, in the trash it goes. We’re here to say that those flooring leftovers don’t have to sit around and collect dust! We’ve come up with four easy, affordable, and creative DIY ideas to take that leftover flooring from pile of clutter to a custom creation!

  • Add an Easy to Clean Cabinet Lining: Peel-and-stick laminate flooring can be reused in place of shelf paper to line the bottom of cabinets and drawers. Since the tile is thicker and less absorbent than traditional shelf paper, it does a much better job protecting the wooden bottom of cabinets and drawers from small leaks and spills. You can even line the cabinet underneath the sink to provide an extra moisture barrier. Installation is simple: make sure the bottom is completely clean and dry, then peel the paper off the laminate and stick it down. Use a razor blade or utility knife to cut squares smaller for a custom fit.
 
 
 Read MORE: http://bobwagner.com/creatively-repurpose-flooring-will-absolutely-save-money/

Friday, May 2, 2014

The secret to choosing a wood floor that's right for you


Are you considering purchasing a wood floor?
Do you have a wood floor and wonder why it scratches so easily?
Did you know there is a universal hardness rating scale for wood floors?

It’s called the Janka rating. (See below for a Janka rating scale) The Janka rating assigns a numeric value to wood species based on the Janka Hardness Test.
The test measures the force required to embed a .444” steel ball into a sample of wood half of its diameter.


The industry benchmark is Red Oak, which has a rating of 1290. The relative hardness of all other wood species are compared to this benchmark.


Red Oak -1290


Okay, what does that mean?

We all know the harder the wood, the more durable, more resistant to scratches, longer life, etc. So the question is, how hard is your floor? To know that you first have to determine the species.

Red oak makes up roughly 37% of all wood floors installed in the United States. Why? Red oak is a domestic product and, compared to nearly every other domestic, it is more common (cheaper) and has a higher Janka rating (1290).

A few examples of other domestic species with higher Janka ratings are:


White Oak -1360

Maple -1450

Hickory -1820


Each of these has a different look than Red Oak, which factors into its popularity along with, obviously, cost (all are less common compared to Red Oak).

A very common domestic hardwood seen in many older homes is Yellow Pine -690-870 (depending on what part of the tree the wood was taken from). Yellow pine is extremely soft. A dog’s nails will scratch grooves into Yellow Pine very easily.

Yellow Pine -690-870


An increasingly popular choice for wood flooring is bamboo, which is a grass, not a wood. Bamboo is very hard -1650 because of how it is manufactured. We have an entire blog post about bamboo manufacturing. I’ll put the link at the bottom. I’ve seen staples bend during the installation of strand woven bamboo flooring.

Bamboo -1650


Other popular imported high Janka rating species are:

Santos Mahogany -2200

Brazilian Cherry -2820

Brazilian Teak -3450


Hardness should play a large part when considering what type of wood floor you are going to purchase. Questions you should ask yourself:

  • What kind of traffic will my floor get? (Kids, dogs, commercial etc.)
  • Am I willing to live with scratches in the floor (sometimes they can add to the character)
  • What can I afford?
  • How long do I want my new floor to last?


Finally, the beauty of wood floors (and even bamboo in some instances) is they can be sanded and refinished giving your floor a completely new or different look. A quality wood floor should last as long as the house around it.


A very cool time-lapse video of a floor sanding and refinishing:


The Janka Rating scale


Learn more about how bamboo floors are made.


Tuesday, April 22, 2014

The secret to preventing your wood floors from failing


To prevent your wood floors from failing (coming apart, pushing together, cracking or worse), you must first understand them...and they're more complicated than you'd think (like some people I know).

Come winter, Fall, Summer, Spring, wood floors behave differently.  They also behave differently depending on where you live. Why?

Humidity.

Ever notice in the humid summer months your doors stick?  This is because wood swells when it is humid.  The same can be true for wood flooring. Both solid hardwoods and engineered hardwoods are susceptible.  

The inverse is also true. Low humidity causes wood to shrink.

Any floor, solid or engineered will expand or contract with changes in humidity.  The wider the flooring, the more expansion and contraction. This means any floor, solid or engineered may and often does experience seasonal gapping or cupping (see below for definitions of gapping and cupping). Seasonal gapping and minor seasonal cupping is normal.  When purchasing a solid or engineered wood floor, your salesperson should tell this to you so you aren't caught unaware and think your floor has a problem after it's installed.

The amount of seasonal gapping/cupping depends on many factors.  Species, thickness, wood grain orientation and width are the main factors.  

Can you avoid seasonal gapping/cupping?  No.  In theory, you could if you maintain a completely stable relative humidity throughout the areas with the wood floors.  In reality, this is impossible.  Regardless of how tightly sealed your windows are, how effective your dehumidifier is, the humidity levels in your home will change.

35% - 55% is the recommended relative humidity range for wood floors

Good news.  You can keep seasonal gapping/cupping to a minimum (and avoid ruining your floors) by keeping the relative humidity within the recommended range. 35% - 55% is the recommended range.  A good flooring company won't even install a wood floor without checking moisture levels in your home and confirming the humidity is within range.  (if they don't, insist they do) Once they're done with the install it is up to you to see that you provide your floor a nice, cozy environment.

How?

Purchase a hygrometer.  A good flooring company (like Bob Wagner's) will provide one when you purchase your floor.  This allows you to monitor humidity levels and confirm that your home is ready for the install.


 What happens if my home's humidity levels move out of the recommended range?

 Cupping, crowning, gapping, oh, my! (and buckling)

Gapping: low humidity causes the wood planks to shrink and move away from each other causing a gap between planks.

Gapping


Cupping: The edges of the floor planks are pulled up while the center remains lower.  This happens when the top of the floor looses moisture but the bottom doesn't follow.  It can also happen when the bottom of the planks absorb moisture from the subfloor and expand.  Minor cupping is a normal result of seasonal relative humidity levels.

Crowning: The center of the floor planks are higher than the edges.  This happens when the moisture on the top of the floor is higher than the bottom.


 Buckling: Extreme expansion of the floor planks.  Usually caused by a water leak or severe moisture conditions.

Buckling

What if the humidity levels creep toward the edges of the recommended range?

If your home starts to close in on the 35% range, turn on your humidifier.  Don't have one?  Buy one.  No doubt you've spent quite a bit of money on your floor.  If you don't want it ruined, invest in a humidifier.

If your home starts to close in on the 55% range, turn on your (you can probably tell where I'm going with this) dehumidifier.

Where you live will determine whether you are likely to need one or the other or both.  If you live in Houston, for example, chances are you'll never need a humidifier.  Live in Phoenix and you'll probably never need a dehumidifier.

For those of us who live in more seasonally affected areas, having one of each (or a whole house unit) is wise.

Typical seasonal impact on wood floors looks something like this:

Spring: low to moderate humidity levels, not much seasonal gapping in the flooring


Summer: moderate to high humidity levels, floor joints will swell and press against each other


Fall: low to moderate humidity levels, not much seasonal gapping in the flooring


Winter: moderate to low humidity levels, most seasonal gappinng occurs in the winter


Is there a 'best' season to install my hardwood floor?

Spring and fall, when the humidity levels tend to be the most 'average' for the year.

Just remember,

humidity is EVERYTHING when it comes to wood floors.


Wednesday, August 28, 2013

Hardwood transitions 101. Guide to making sure you choose wisely.

Transitions, molding, trim, accessories, oh my!


quarter round, reducer, threshold, t-molding, stairnose, baseboard, hardwood accessories, bob wagner's flooring america, middletown, downingtown, west chester

In the industry, it is called by different names.  I can only imagine how confusing it must be for customers when it comes to understanding industry lingo.  I like transition.  Why?  Because you're either transitioning between one product or another, one room or another or one surface or another.

Why are transitions important?

If there is one thing that is likely to go wrong with a hardwood installation it is almost always related to the transitions.  Either they were omitted completely (this is why using a business that's been in the industry and focuses on flooring is so important), the wrong transition type was recommended, they didn't match the floor, they were on back order...the list goes on.  If you're one of those people who can't stand a project that gets 90% complete and then grinds to a halt, this knowledge is for you.

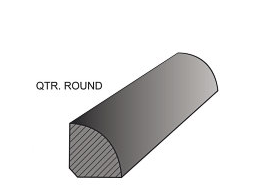
Being proactive is key.  Ask about transitions.  Ask about possible back orders.  Explore stain-to-match options, (sometimes unfinished transitions professionally stained to match your floor look better than the manufacturer's transitions...and cost less, too) ask whether the flooring will go under the baseboards (#4) or will require quarter round (#5) or shoe molding (#6). If you don't know, ask.


There are six bread and butter transitions for most hardwood floors.

#1 REDUCER

First is the reducer.  There are numerous types of reducers but this is the 101 class.  Proceed down the hall for the advanced class.  The reducer simply reduces the height of the hardwood floor down to a floor of different a different height.  For example, if you had a doorway with hardwood in one room and vinyl in another, you could put a reducer up against the hardwood and over the vinyl.


quarter round, reducer, threshold, t-molding, stairnose, baseboard, hardwood accessories, bob wagner's flooring america, middletown, downingtown, west chester
Reducer
Below is a photo of a reducer over a vinyl tile floor.


quarter round, reducer, threshold, t-molding, stairnose, baseboard, hardwood accessories, bob wagner's flooring america, middletown, downingtown, west chester

#2 T-Molding

Second is the T-molding.  Named after its shape, the T-molding joins two floors of equal height.


quarter round, reducer, threshold, t-molding, stairnose, baseboard, hardwood accessories, bob wagner's flooring america, middletown, downingtown, west chester 

Below is a drawing of a T-molding seated in a hardwood floor.

quarter round, reducer, threshold, t-molding, stairnose, baseboard, hardwood accessories, bob wagner's flooring america, middletown, downingtown, west chester
T-molding

#3 Stairnose

Third is a stairnose.  A stairnose is typically used at the edge of a step to round off the edge.


quarter round, reducer, threshold, t-molding, stairnose, baseboard, hardwood accessories, bob wagner's flooring america, middletown, downingtown, west chester

Below are two installed stairnose.  Notice the width of the stairnose is no greater than the flooring boards behind it.

quarter round, reducer, threshold, t-molding, stairnose, baseboard, hardwood accessories, bob wagner's flooring america, middletown, downingtown, west chester

#4 Baseboard

Fourth is the baseboard.  The baseboard covers the raw edges of the hardwood where it meets the walls.  Many times, especially in homes that are being remodeled, the baseboard is already on the walls and the hardwood is unable to be installed beneath.

quarter round, reducer, threshold, t-molding, stairnose, baseboard, hardwood accessories, bob wagner's flooring america, middletown, downingtown, west chester
Baseboard
Below is a photo of baseboard installed directly over the raw edges of the hardwood flooring.

quarter round, reducer, threshold, t-molding, stairnose, baseboard, hardwood accessories, bob wagner's flooring america, middletown, downingtown, west chester


#5 Quarter Round
#6 Shoe Molding

Numbers five and six accompany the baseboard when the raw edges are unable to be installed beneath.  They are the quarter round and shoe molding.


quarter round, reducer, threshold, t-molding, stairnose, baseboard, hardwood accessories, bob wagner's flooring america, middletown, downingtown, west chester
shoe molding

As you can see, there is a difference in shape and size.  Using one versus the other depends on the gap that requires covering (the raw edges of the hardwood) as well as the desired look.  Below is a shoe molding installed over vinyl tile against a typical baseboard.


quarter round, reducer, threshold, t-molding, stairnose, baseboard, hardwood accessories, bob wagner's flooring america, middletown, downingtown, west chester


All other transitions are simply variations of the transitions described above. 


quarter round, reducer, threshold, t-molding, stairnose, baseboard, hardwood accessories, bob wagner's flooring america, middletown, downingtown, west chester
Baseboard over hardwood
quarter round, reducer, threshold, t-molding, stairnose, baseboard, hardwood accessories, bob wagner's flooring america, middletown, downingtown, west chester
Wood to carpet with a reducer
quarter round, reducer, threshold, t-molding, stairnose, baseboard, hardwood accessories, bob wagner's flooring america, middletown, downingtown, west chester
Tile to wood where a turned board serves as a transition
quarter round, reducer, threshold, t-molding, stairnose, baseboard, hardwood accessories, bob wagner's flooring america, middletown, downingtown, west chester
Wood against a fireplace (details below)
Like the tile to wood transition, the above fireplace was installed not with a traditional transition piece but by simply turning a board. We call this using a header board.  You can use as many as you'd like depending on the look you're going for. 


Next time: Pets for Patriots; What Bob Wagner's is doing to help create happy, loving homes for adult shelter pets and military personnel; whiskers and wet noses galore. 


A special thanks to our vendors, Armstrong, Mullican Flooring and Tague lumber for providing some of the images. 


A Solomon Caw Media Company publication
internet marketing solutions 
for brick and mortar companies


Tuesday, August 20, 2013

Launching an innovative new blog...Fuzzy Side Up

Prepare for launch!


fuzzy side up, bob wagner's, flooring america, bob wagner's flooring america, flooring, carpet
Click for image source information


The official launch day of our Fuzzy Side Up blog is here!

What we're about:

At Bob Wagner's, we are more than just a collection of the area's elite floor covering experts. ( If you're looking for information on what we sell, please visit our website.  You won't find it here.) We are designers, educators, storytellers, innovators, problem solvers and philanthropists. 

Through this blog we plan to take these talents and share them with our readers.

What you will find:


  • Great design ideas
  • One of a kind educational videos that will take you from product selection to installation and beyond
  • Informative posts that delve into all aspects of flooring -from preparing your home for an installation to selection a transition between your new and old floor- and everything between
  • New and innovative techniques we have and will implement to give our customers the best quality installations along with the best products
  • Tips on how to DIY (do it yourself) minor repairs and installations
  • Photo-journals of projects we love
  • News about the best part of being a small business in a great community; giving back.
We are very excited to be able to provide our readers with a great source of information and ideas unparalleled in our industry. 

Next up: Hardwood transitions 101: Everything you need to know about selecting a transition between products (or the same product) from a hardwood floor.


A Solomon Caw Media Company publication